MD-Blog_Web Creative
Grunt.js :: ECTを使って同じ要素を量産する
明けましておめでとうございます! 今年も、MD-Blogをよろしくお願いいたします。
今回のテーマは『Grunt.js :: ECT』です。以前の記事では、1つのページレイアウトで大量のHTMLを生成するというケースをご紹介しましたが、今回はそのバリエーションになります。
Movable TypeやWordpressなどサーバサイドのCMSを使わなくても、JavaScript製テンプレートエンジンで効率的にコードが出力できる「ECT」。実例を上げて解説していきましょう!
ちなみに、コンテンツを管理する方法はECTの他にも色々ありますが、そのあたりのトピックは、以前、「コンテンツ管理について考えて、ひとつ作ってみる。」で紹介してるので、ご参考にどうぞ。
今回やりたいこと
1つのHTMLの中で、デザインは同一で内容が異なるものが複数パターンある場合、1つ1つをコピー&ペーストで増やしていくのは手間がかかります。
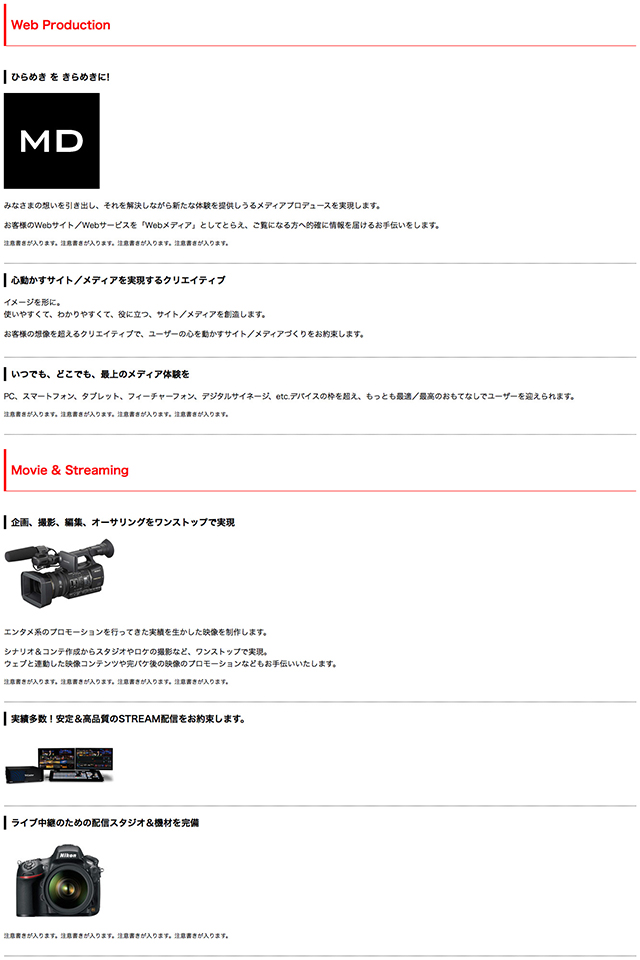
例えば、下記のようなHTMLです。
サンプル

ECTを利用することによって、量産する手間を省いて、簡単に大量のコンテンツを増やすことが出来ます。
手順
今回の手順は以下のとおりです。
- 読み込み用のJSファイルを、カテゴリーごとに別々のJSファイルとして用意する
- ECTに読み込む用のJSファイルをgruntに読み込む
- 必要に応じてコンテンツ部分を出力する
カテゴリーごとにJSファイルを分割したのは、複数のメンバーで分担して作業を可能にするためです。
コーディングが完了した後に、どの値をECTで出力するかを決め、JSファイルに値を書いていきます。
ECTでファイルを出力する
ディレクトリ構成
ECTのテンプレートを格納するフォルダと、HTML等の作業を行うフォルダとは分けるようにしています。
    project
    ├ src/                        (ECTのテンプレートなどのコンパイルして使うファイルを格納するフォルダ)
    │└ ect/
    │ ├ modules/
    │ │ ├ contents.js         (Gruntfile.jsに読み込みJS)
    │ │ ├ category1.js        (contents.jsに読み込みJS。Web Productionの値を記載)
    │ │ └ category2.js        (contents.jsに読み込みJS。Movie & Streamingの値を記載)
    │ │
    │ └ template/
    │   ├ top.ect
    │     ├ inc_head.ect            (ヘッド部分のDOM要素)
    │     ├ inc_body.ect            (ボディ部分のDOM要素)
    │     └ inc_contents.ect        (コンテンツ部分のDOM要素。inc_contents.ectにincludeする)
    │
    ├bin/                         (出力されたHTMLファイル)
    │├index.html                (作業フォルダ)
    │└images/
    │
    ├package.json
    └Gruntfile.js
Gruntfile.js
Gruntfile.jsのソースは下記の通りです。
'use strict';

var _categoryDestList = [],         // ECTのタスクを実行するオブジェクトを格納する配列
    _categoryList = ['contents'],     // 値を読み込んでいる大元のJSの名前
    _setEct;

/**
 * ECTにセットするオブジェクトを作る
 */
_setEct = function () {
    var _modulePath = './src/ect/modules/',     // ECTに渡す値を格納しているフォルダを選択
        _destEct = 'bin/index.html',            // 出力先と出力するファイル名を設定する
        _i = -1,
        _length = _categoryList.length;

    // 配列にECTのタスクに作るオブジェクトを渡す
    while (++_i < _length) {
        _categoryDestList[_i] = {
            src: 'top.ect',
            dest: _destEct,
            variables: require(_modulePath + _categoryList[_i] + '.js')
        };
    }
};
_setEct();

module.exports = function (grunt) {
    var pkg, taskName;
    pkg = grunt.file.readJSON("package.json");
    grunt.initConfig({
        pkg: pkg,
        ect: {
            options: {
                root: 'src/ect/template'
            }
        }
    });

    /**
     * ECTにタスクをセットする
     */
    (function () {
        var _i = -1,
            _length = _categoryList.length,
            _fileName = '';

        while (++_i < _length) {
            _fileName = _categoryList[_i];
            grunt.config.data.ect[_fileName] = _categoryDestList[_i]
        }
    })();


    /**
     * pakage.jsonに記載されているパッケージを読み込み
     */
    for (taskName in pkg.devDependencies) {
        if (taskName.substring(0, 6) === "grunt-") {
            grunt.loadNpmTasks(taskName);
        }
    }
};
ECT
ECTのソースはこちら。
modulesフォルダ
modulesフォルダには、Gruntfile.jsに値を渡すJSファイルや、各コンテンツに入る要素を値を入れたJSファイルを格納しています。
- contents.js
Gruntfile.jsに読み込むcontents.jsのソースは以下のようになります。
'use strict';

// 外部JSから値を取得する
var category1 = require('./category1.js'),
    category2 = require('./category2.js');

var detail = {
    // 出力タイトル
    title: 'ECT SAMPLE',
    // 出力するキーワード
    keywords: 'キーワード1, キーワード2, キーワード3',
    // 出力するディスクリプション
    description: 'ディスクリプションが入ります。',
    // カテゴリ数に応じてオブジェクトを増やす
    setting: [
        {flag: '0', name: 'Web Production'},
        {flag: '1', name: 'Movie & Streaming'}
    ],
    // 外部JSから受け取る値を格納する配列
    category1: [],
    category2: []
};

// 外部JSから値を取得する関数
var getObject;
getObject = function (category, arr) {
    var _i = -1,
        _length = category.details.length;

    for (; ++_i < _length;) {
        arr.push(category.details[_i]);
    }
};

// 関数を実行する
getObject(category1, detail.category1);
getObject(category2, detail.category2);

// Gruntfile.jsに値を渡す
module.exports = detail;
- category1.js(contentsの値を格納したJS)
contents.jsに渡すcategory1.jsのソースは以下のようになります。カテゴリーが増えた場合は、必要に応じてファイルを増やしてください。
'use strict';

/**
 * オブジェクトの中身の説明
 * content      コンテンツのタイプを選ぶ(0:テキストのみ, 1:画像のみ, 2:画像とテキスト)
 * title        タイトル
 * imgPath      contentのflagが1と2の場合は、画像パスを書く
 * txt1, txt2   contentのflagが0と2の場合は、テキストを書く。txt2は任意
 * attention    注意書きを記載する(任意)
 */

var category1 = {
    details: [
        {
            content: '2',
            title: 'ひらめき を きらめきに!',
            imgPath: 'sample_1.jpg',
            txt1: 'みなさまの想いを引き出し、それを解決しながら新たな体験を提供しうるメディアプロデュースを実現します。 ',
            txt2: 'お客様のWebサイト/Webサービスを「Webメディア」としてとらえ、ご覧になる方へ的確に情報を届けるお手伝いをします。',
            attention: '注意書きが入ります。注意書きが入ります。注意書きが入ります。注意書きが入ります。'
        },
        {
            content: '0',
            title: '心動かすサイト/メディアを実現するクリエイティブ ',
            imgPath: '',
            txt1: 'イメージを形に。
使いやすくて、わかりやすくて、役に立つ、サイト/メディアを創造します。',
            txt2: 'お客様の想像を超えるクリエイティブで、ユーザーの心を動かすサイト/メディアづくりをお約束します。',
            attention: ''
        },
        {
            content: '0',
            title: 'いつでも、どこでも、最上のメディア体験を',
            imgPath: '',
            txt1: 'PC、スマートフォン、タブレット、フィーチャーフォン、デジタルサイネージ、etc.デバイスの枠を超え、もっとも最適/最高のおもてなしでユーザーを迎えられます。',
            txt2: '',
            attention: '注意書きが入ります。注意書きが入ります。注意書きが入ります。注意書きが入ります。'
        }
    ]
};

module.exports = category1;
templateフォルダ
templateフォルダには、ECTファイルを格納しております。
- top.ect
Gruntfile.js側で指定するECTテンプレートになります。Gruntfile.jsから値を受け取るのもこのテンプレートなので、読み込むテンプレートに対して値を渡してあげます。
<% include 'inc_head.ect', {title:@title, description:@description, keywords:@keywords} %>
<% include 'inc_body.ect', {setting:@setting, category1:@category1, category2:@category2} %>
- inc_head.ect
タイトルな部分の値は、contents.js内にある title/keywords/description の値を受け取っています。
    <!DOCTYPE html>
    <head>
    <meta charset="utf-8">
    <title><%- @title %></title>
    <meta name="keywords" content="<%= @keywords %>">
    <meta name="description" content="<%= @description %>">
    <style>
    .category { margin-bottom: 30px; }
    .category:last-child { margin-bottom: 0; }
    .category-head {
        margin-bottom: 50px;
        border-bottom: 1px solid red;
        border-left: 5px solid red;
        padding: 5px 0 5px 10px;
        color: red;
    }
    .content {
        margin-bottom: 20px;
        padding-bottom: 20px;
        border-bottom: 1px dotted #000;
    }
    .content:last-child { margin-bottom: 0; }
    .content-head {
        margin-bottom: 10px;
        border-left: 5px solid #000;
        padding: 0 0 0 10px;
    }
    .attention { font-size: 12px; }
    </style>
    </head>
- inc_body.ect
カテゴリー名の出力は、このテンプレートから行っています。詳細コンテンツを表示させるinccontents.ectを読み込んでおり、setting内のflagに応じてテンプレート(inccontents.ect)に渡すオブジェクトを変更しています。
    <body>
    <% for setting in @setting : %>
    <section class="category">
    <header class="category-head">
    <h2 class="title"><%- setting.name %></h2>
    <!-- / .category-head --></header>
    <div class="category-body">
    <% if setting.flag is '0': %>
    <% include 'inc_contents.ect', {details:@category1} %>
    <% end %>
    <% if setting.flag is '1': %>
    <% include 'inc_contents.ect', {details:@category2} %>
    <% end %>
    <!-- / .category-body --></div>
    <!-- / .category --></section>
    <% end %>
    </body>
    </html>
- inc_contents.ect
詳細コンテンツを出力するためのテンプレートになります。@detailsの値は、読み込み先のinc_body.ectから受け取ってる値に応じて出力する内容を変えています。
    <% for details in @details : %>
    <section class="content">
    <header class="content-head">
    <h3 class="title"><%- details.title %></h3>
    <!-- / .content-head --></header>
    <div class="content-body">
    <% if details.content is '0': %>
    <div class="txt-box">
    <p class="txt"><%- details.txt1 %></p>
    <% if details.txt1.length : %>
    <p class="txt"><%- details.txt2 %></p>
    <% end %>
    <!-- / .txt-box --></div>
    <% end %>
    <% if details.content is '1': %>
    <div class="img-box"><img src="images/<%= details.imgPath %>" alt="sample" class="img"></div>
    <% end %>
    <% if details.content is '2': %>
    <div class="img-box"><img src="images/<%= details.imgPath %>" alt="sample" class="img"></div>
    <div class="txt-box">
    <p class="txt"><%- details.txt1 %></p>
    <% if details.txt1.length : %>
    <p class="txt"><%- details.txt2 %></p>
    <% end %>
    <!-- / .txt-box --></div>
    <% end %>
    <% if details.attention.length : %>
    <p class="attention"><%- details.attention %></p>
    <% end %>
    <!-- / .content-body --></div>
    <!-- / .content --></section>
    <% end %>
出力結果を確認しよう
準備が終わったら、ターミナルからECTのコマンド実行します。
grunt ect
実行すると、下記のように表示されます。
Running "ect:contents" (ect) task
File bin/index.html created.
実際に出力されたHTMLサンプルはこちらでご覧いただけます。
まとめ
ECTを使えば、CMSを使わなくても、HTMLの量産や同じ要素の量産・出力が簡単に出来ます。Movable TypeなどのCMSでも同様の処理は実現出来ますが、初期設定にかかる時間を短縮出来る点や、サーバサイドではなくフロントエンドの作業だけで完結できるということがポイントです。
一度作成してしまえば、その後の更新や変更の際にはJSファイルを修正してコマンドを叩くだけでHTMLが生成されるので、例えばディレクターやデザイナーなど、エンジニア以外のメンバーに運用を任せることができるようになる、という利点もありますね。設定ファイルを分割しておくことで、文言校正や要素の追加作業を同時平行して進行することも出来るようになります。
デメリットとしては、とはいえ更新作業にはJSファイルを編集したり、ターミナルからコマンドを実行する...という手順が必要になるので、オペレーターや企業担当者が運用を行うようなWebサイトの場合は、ハードルが高いかもしれません。
Gruntは、ECTの他にも便利な機能が沢山あります。是非一度使ってみていただければ!
- Recent Entries
-
- 画像を読み込ませるだけでコードを書かずにWebサイトを作れる「Windsurf」を試してみた
- 高額療養費制度を実際に利用してみた! 申請から給付までの流れ
- ライブ配信の仕事って実際どうなの? 現場のリアルを担当者が語る!職種別インタビュー!
- 実践に役立つ【ペルソナ設計】のポイントを、 WEBディレクターが真剣に考えてみました!
- ハイエースドライバーへの道 vol.2 〜免許取得から数ヶ月...ハイエース運転で味わった苦い経験と、社内で動き出した「運転手」のためのルールづくり〜
- 気づけば5年目!未経験ディレクターがここまで来た話
- アイディアを実現させる、MONSTER DIVEが創るライブ配信
- 大規模イベントで活躍中!Solidcom C1 Pro - Roaming Hub
- アルムナイ採用された側は、戻ってきた会社に何を感じたか
- データ検証の強い味方『Zod』のススメ
- MD EVENT REPORT
-
- MDの新年はここから。毎年恒例の新年のご祈祷と集合写真
- 2024年もMONSTER DIVE社内勉強会を大公開!
- 社員旅行の計画は「コンセプト」と「事前準備」が重要! 幹事さん必見! MONSTER DIVEの社内イベント事例
- 5年ぶりの開催! MONSTER DIVE社員旅行2024 "Build Our Team"!
- よいモノづくりは、よい仲間づくりから 「チームアクティビティ支援制度」2023年活動報告!
- 2023年のMONSTER DIVE勉強会を大公開!
- リフレッシュ休暇の過ごし方
- 勤続10周年リフレッシュ25連休で、思考をコンマリしたりタイに行った話。
- 俺たちのフジロック2022(初心者だらけの富士山登山)
- よいモノづくりは、コミュニケーションから始まる
- What's Hot?
-
- 柔軟に対応できるフロントエンド開発環境を構築する 2022
- 楽しくチームビルディング! 職場でおすすめのボードゲームを厳選紹介
- ライブ配信の現場で大活躍! 「プロンプター」とは?
- 名作ゲームに学べ! 伝わるUI/UXデザインのススメ
- 映像/動画ビギナーに捧げる。画面サイズの基本と名称。
- [2020最新版] Retinaでもボケない、綺麗なfaviconの作り方
- ビット(bit), バイト(Byte), パケット。ついでにbps。 〜後編「で、ビットとバイトって何が違うの?」〜
- 有名企業やブランドロゴに使われているフォントについて調べてみる。
- 算数ドリル ... 2点間の距離と角度
- 画面フロー/システムフローを考えよう!
- タグリスト
-
- #Webデザイン
- #JavaScript
- #MONSTER DIVE
- #映像制作
- #Movable Type
- #ライブ配信
- #CMS
- #ワークスタイル
- #MONSTER STUDIO
- #Webプロモーション
- #Web開発
- #アプリ
- #Creators Lab まとめ
- #Webディレクターのノウハウ
- #MTタグを極める
- #効率化
- #MD社内イベント
- #CSS
- #撮影
- #プランニング
- #Webクリエイティブ
- #オーサリング
- #クレバー藤原
- #コーディング
- #スマートフォン
- #Webディレクション
- #早朝がいちばん捗るヒト
- #PowerCMS
- #グラフィックデザイン
- #WEBサービス
- #サマンサ先生
- #ストリーミング配信
- #人事
- #Android
- #iPhone
- #Webメディア
- #まとめ
- #ディレクション
- #プログラミング
- #新入社員
- #HTML5
- #iOS
- #jquery
- #RIDE HI
- #UI/UXデザイン
- #プラグイン
- #Adobe
- #アニメーション
- #プロジェクト管理
- #ライブ中継
